Monday, February 24, 2014
ITALIAN RENAISSANCE gramaphone cabinet
Unique compared to todays style and shape of furniture,
Im sure most didnt see potential in the original piece the way it was found at the auction.

It had been altered long before we ever set eyes on it, but
it did have a makers mark on it the back making it possible to do some research.

It is a McLagan cabinet probably pre 1920s
in an Italian Renaissance style.
Originally a phonograph cabinet made in Stratford, Ontario Canada.

The doors swing completely around to sit flush to the sides.
It had a copper pipe cut to fit inside the upper part of the cabinet
Ive assumed maybe for babies clothes.

Gorgeous little drop pulls

I sprayed it an off white and used a custom blue for the intricate trim.


As seen here above there is an interesting pull out surface,
something I dont believe was an original feature of the cabinet.

The pull is perfect for folding towels, before storing them away.


Sharing with:


I ordered a new table saw!
Great news! I have ordered a new table saw and it should be arriving some time tomorrow, I cant wait, its like Christmas.....

I ordered a professional grade cabinet saw, the Grizzly 1023SL. I have been wanting a new table saw for quite some time now but I have been putting it off due to a couple reasons (the leaking roof which isnt perfectly fixed but it is much better than it was, and lack of funds for a new toy), but I decided that it was time to jump.
Deciding what table saw to purchase was definitely a tough decision, but it was fun researching and learning so much about different table saw on the market. When I first looked at table saws I was looking at something in the $600-$900 range. I was liking the contractor saws that I was finding on the Rockler website, they were the only ones that fit in my budget and that was the only place I really knew to look for saws.
So I decided on a saw but then I couldnt decide which fence I wanted with it since there were three different options, the best which was about $300 dollars more than the basic fence. I decided to join a woodworking forum and ask people who actually knew what they were talking about. So that is when I found Lumberjocks.com, and I am glad I did as the community was most helpful.
I asked my question and people started chiming in with suggestions. A few people said that I should skip the contractor saw and just go with a professional grade cabinet saw for $200 more than $900 contractors saw that I was eyeing. The saw that was suggested was the Grizzly 1023SL. After reading countless reviews and asking more and more questions on the forum I realized that all of the experienced folks at Lumberjocks knew what they were talking about so I decided to fork out a bit more money and get the full blown cabinet saw.
I think I will glad that I choose the cabinet saw over the contractor saw because the price wasnt an extreme difference but the quality of the saw should be a big difference. Looks like we will see tomorrow!
Read More..
I ordered a professional grade cabinet saw, the Grizzly 1023SL. I have been wanting a new table saw for quite some time now but I have been putting it off due to a couple reasons (the leaking roof which isnt perfectly fixed but it is much better than it was, and lack of funds for a new toy), but I decided that it was time to jump.
Deciding what table saw to purchase was definitely a tough decision, but it was fun researching and learning so much about different table saw on the market. When I first looked at table saws I was looking at something in the $600-$900 range. I was liking the contractor saws that I was finding on the Rockler website, they were the only ones that fit in my budget and that was the only place I really knew to look for saws.
So I decided on a saw but then I couldnt decide which fence I wanted with it since there were three different options, the best which was about $300 dollars more than the basic fence. I decided to join a woodworking forum and ask people who actually knew what they were talking about. So that is when I found Lumberjocks.com, and I am glad I did as the community was most helpful.
I asked my question and people started chiming in with suggestions. A few people said that I should skip the contractor saw and just go with a professional grade cabinet saw for $200 more than $900 contractors saw that I was eyeing. The saw that was suggested was the Grizzly 1023SL. After reading countless reviews and asking more and more questions on the forum I realized that all of the experienced folks at Lumberjocks knew what they were talking about so I decided to fork out a bit more money and get the full blown cabinet saw.
I think I will glad that I choose the cabinet saw over the contractor saw because the price wasnt an extreme difference but the quality of the saw should be a big difference. Looks like we will see tomorrow!
Talladega Time!
It finally time to head back to the Talladega Infield!!!!
This has been an event that I have been attending for about 8 years now, twice a year and I have never missed a NASCAR race at Talladega since the fist time I went.
I pull my camper up there and we stay in the infield and party for 4-5 days, it gets wild. There are about +60,000 fans in the infeild staying in everything from RVs, tents, and horse trailers. Lots of rednecks, lots of beer, lots of wild activities.
This year, we are going up on Wednesday and staying until Monday. We went on Wednesday last race and it was great getting their early. Usually I dont head up until Thursday though.
I cant wait but I have alot of work to do, getting the camper ready, buying the food, getting all of my friends beer and luggage in the camper, getting LOTS of ice, fixing some ruined cornhole bags, the list goes on and on........
Read More..
This has been an event that I have been attending for about 8 years now, twice a year and I have never missed a NASCAR race at Talladega since the fist time I went.
I pull my camper up there and we stay in the infield and party for 4-5 days, it gets wild. There are about +60,000 fans in the infeild staying in everything from RVs, tents, and horse trailers. Lots of rednecks, lots of beer, lots of wild activities.
This year, we are going up on Wednesday and staying until Monday. We went on Wednesday last race and it was great getting their early. Usually I dont head up until Thursday though.
I cant wait but I have alot of work to do, getting the camper ready, buying the food, getting all of my friends beer and luggage in the camper, getting LOTS of ice, fixing some ruined cornhole bags, the list goes on and on........
Little secretary chest
I have been super busy lately! So much going on! But, I did manage to get his one finished before everything started. I have just been too busy to post it! I picked up this solid maple chest with a pull down secretary. I mixed my own cp for the outside and used CeCe Caldwell's "Slate" for the inside.


Sunday, February 23, 2014
How to build Cornhole Boards A video Tutorial
Here is my video on how to make a nice set of cornhole boards. Everything is up to the tournament standards and these thing look nice. Not just some plywood and 2x4s.
Anyone can build these with just a few simple tools.
The pocket hole screws were my preferred method although you could simply screw from the outside of the 1x4 into the plywood deck, predrilling and glueing would be recommended. Nails would probably work in place of screws but I would be sure and put plenty of both nails and glue.
I hope you all enjoy!
Read More..
Anyone can build these with just a few simple tools.
The pocket hole screws were my preferred method although you could simply screw from the outside of the 1x4 into the plywood deck, predrilling and glueing would be recommended. Nails would probably work in place of screws but I would be sure and put plenty of both nails and glue.
I hope you all enjoy!
THE PRINCESS AND THE FROG blue bedroom chair
There will eventually be a second part to this post
as this cute antique chair has a partner.
They were both painted using blue and white chalk paint.

The first thing I did was to remove the trim around the upholstery.
George actually did it while I was painting something else.
Every now and then he likes to help when he can.

I painted the frames in old white first,

then adding a coat of Provence (blue)

I sanded the blue Provence back to expose the old white and the original wood.
I also did a bit of washing with water to lighten and blend the colors,
before removing the velvet upholstery,

A lot of the nails were removed but some were hammered in.
It all depended whether they would be in the way of the new staples and upholstery.

When I purchased these pieces I knew I was going to use a
white quilted coverlet Id been keep for the right project.
I also had a handful of cording that I purchased recently
at a yard sale that would go perfectly with it.

Normally this cording I pulled out of the pile would be sewn into a seem
but when I held it up to the project I liked the way it looked.

I love how every aspect turned out especially the quilting against the layer of colors.

Old things do get creaky over time.
So some stiffening did have to be done to the frame with screws and glue.

I added new foam to make them soft and comfy.

The entire frame was waxed before the upholstering was started.

I used the edge of the coverlet to make the skirt around the chair.
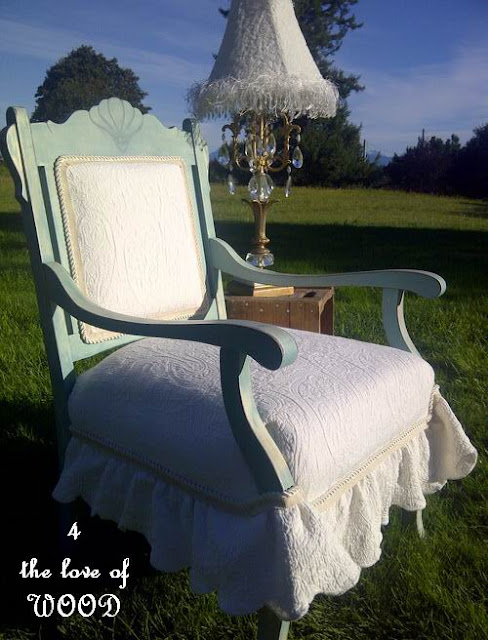
I prefer the look of the skirt on the outside of the legs,

Its like she is showing us a little leg from underneath her dress.

Here is her partner,
did you think it was another chair?
Watch for when this majestic guy gets turned into a princess,
as opposed to a frog into a prince!!
Sharing at:


WooHoo!!! Cool Campaign Desk
I'm kinda jazzed I finally picked up one of these Campaign desks
w/the faux bamboo!! This one is made by Dixie!! Even better!

I know,,,,,right??!! What the???!! So, I asked the women selling, "Oh, you started to
refinish (refinish?? more like mutilate) it?"
Her: "Yeah"
Me: "Um, what did you use on the top?"
Her: "Oh, a scraper."
Me: Audible gasp..........
Her: "Was that bad?"
Um, Gee,......Ya think???!!!!

I actually think the surface of the moon feels smoother than the top of this desk.
Running my hand over the top and feeling all the divots and gouges just makes me
TREASURE CHEST beach cottage dresser
A little says a lot.

Before and After


Fresh and airy paint treatment.


New rope trim and vintage brass hardware.


Hand waxed finish from top to bottom.

Vintage French postcard print drawer lining


Sharing this at:


Subscribe to:
Comments (Atom)