Showing posts with label the. Show all posts
Showing posts with label the. Show all posts
Monday, March 3, 2014
Mere Minutes following up on the cabinet
First Mere Minutes of the year. Answering a few questions about this weeks cabinet project. And some other odds and ends..
Read More..

Sunday, February 23, 2014
THE PRINCESS AND THE FROG blue bedroom chair
There will eventually be a second part to this post
as this cute antique chair has a partner.
They were both painted using blue and white chalk paint.

The first thing I did was to remove the trim around the upholstery.
George actually did it while I was painting something else.
Every now and then he likes to help when he can.

I painted the frames in old white first,

then adding a coat of Provence (blue)

I sanded the blue Provence back to expose the old white and the original wood.
I also did a bit of washing with water to lighten and blend the colors,
before removing the velvet upholstery,

A lot of the nails were removed but some were hammered in.
It all depended whether they would be in the way of the new staples and upholstery.

When I purchased these pieces I knew I was going to use a
white quilted coverlet Id been keep for the right project.
I also had a handful of cording that I purchased recently
at a yard sale that would go perfectly with it.

Normally this cording I pulled out of the pile would be sewn into a seem
but when I held it up to the project I liked the way it looked.

I love how every aspect turned out especially the quilting against the layer of colors.

Old things do get creaky over time.
So some stiffening did have to be done to the frame with screws and glue.

I added new foam to make them soft and comfy.

The entire frame was waxed before the upholstering was started.

I used the edge of the coverlet to make the skirt around the chair.
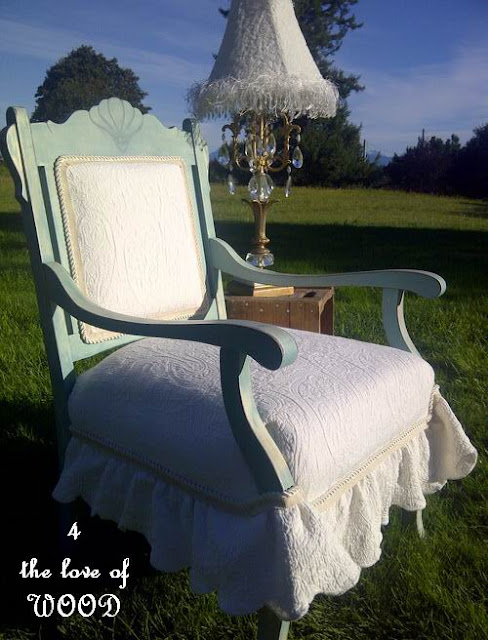
I prefer the look of the skirt on the outside of the legs,

Its like she is showing us a little leg from underneath her dress.

Here is her partner,
did you think it was another chair?
Watch for when this majestic guy gets turned into a princess,
as opposed to a frog into a prince!!
Sharing at:


Saturday, February 22, 2014
The Right Ways Of Anchoring The Deck
Want to create some open-air living space? Building a deck is among the most inexpensive approaches to achieve this and enhance your enjoyment of your home. Certainly you’ve seen decks in publications as well as at your friends’ houses, and now you’ve determined that you’d like to construct a deck. My wish is that this article will provide you with a few pointers together with encouragement, especially if you are a beginner. So let’s get cracking.
You can expect to realize that constructing a deck is a great challenge, even for a person who is new to the whole do-it-yourself world. Here are a few good reasons for this:
You will most probably make your deck out of lumber. This implies that you may not need to have any especially costly or complex tools.
Deck-building materials are not especially costly themselves, thus correcting just about any blunders shouldn’t be financially distressing.
Rarely would deck building include more specialized skills such as plumbing or electrical work.
Your deck undertaking will be outdoors, therefore if there are any construction delays you will not end up with a mess inside your home to look at until eventually construction work resumes.
You’ll find a lot of plans. Provided you can adhere to directions plus use general carpentry tools, success is within your grasp.
Getting the right designs, researching deck building, and talking with well-informed folks at home improvement facilities will certainly go a long choice to assisting you create a successful project. Subject areas which include different types of pressure-treated wood, to stain or not to stain, health and safety issues, best strategies for anchoring the deck, and choosing the right components really are several of the matters that you’ll want to get settled in the beginning. As long as you’re inevitably excited to get rolling with your project, do not hurry the preparing stage. Simply because you’ve determined you want to build a deck doesn’t mean you’ll want to proceed not having specific plans.
When appropriate, you might like to include members of the family in the construction of your deck. A great thing about deck construction is that you don’t need to hurry your responsibilities in order to get the mess out of your home because you’ll be working entirely outside the house. Be sure to get pleasure from your project as much as you will take pleasure in your new deck itself.
Read More..
You can expect to realize that constructing a deck is a great challenge, even for a person who is new to the whole do-it-yourself world. Here are a few good reasons for this:
You will most probably make your deck out of lumber. This implies that you may not need to have any especially costly or complex tools.
Deck-building materials are not especially costly themselves, thus correcting just about any blunders shouldn’t be financially distressing.
Rarely would deck building include more specialized skills such as plumbing or electrical work.
Your deck undertaking will be outdoors, therefore if there are any construction delays you will not end up with a mess inside your home to look at until eventually construction work resumes.
You’ll find a lot of plans. Provided you can adhere to directions plus use general carpentry tools, success is within your grasp.
Getting the right designs, researching deck building, and talking with well-informed folks at home improvement facilities will certainly go a long choice to assisting you create a successful project. Subject areas which include different types of pressure-treated wood, to stain or not to stain, health and safety issues, best strategies for anchoring the deck, and choosing the right components really are several of the matters that you’ll want to get settled in the beginning. As long as you’re inevitably excited to get rolling with your project, do not hurry the preparing stage. Simply because you’ve determined you want to build a deck doesn’t mean you’ll want to proceed not having specific plans.
When appropriate, you might like to include members of the family in the construction of your deck. A great thing about deck construction is that you don’t need to hurry your responsibilities in order to get the mess out of your home because you’ll be working entirely outside the house. Be sure to get pleasure from your project as much as you will take pleasure in your new deck itself.
Tuesday, February 18, 2014
Final Pictures of the Mahogany Carved Box
Its finished and I am very proud of this one. A few more of these document chests or bible boxes (call them whatever you want) and Ill feel prepared to move on to a whole joined chest. But first, there will probably be a foray into joined stools (Thank you Lost Art Press)


Ever since the book "Make a Joint Stool from a Tree" came out 17th century furniture has been under a lot of discussion and I have to admit I was surprised to hear some of it. I expected to hear words like impractical and people claim that green working is not appropriate for craftsman making furniture less than everyday. The one word I was not prepared to read was "ugly."


I can remember the first time I stumbled across Peter Follansbees blog I have been smitten with 17th century style furniture. From the joinery to the carvings, especially the carvings. When I first saw his pieces I thought, now theres something I really want to be able to create.


I like 17th century furniture most because in todays modern age it looks refreshingly new and different. Look into any book on antique furniture and you will likely find a timeline showing the development of furniture styles, often starting with William and Mary baroque styles and pushing forward from there. It will hit on Chippendale, Queen Anne, Federal, Shaker, Craftsman, and Modern styles and at least a dozen more. If you take that list of styles and go to any large furniture store filled to the bursting doors with mass produced, disposable furniture you will find some watered down version of each style represented.


I have never seen an attempt at 17th century furniture in a press board, paper veneered fashion. I dont believe thats because its "ugly" I believe its because its too difficult to mass produce even a watered down piece of this style. I suppose it could be done, but why should corporations go to the bother when they already have so much other crap, built to the lowest common denominator, to convince you to buy.


The eye is drawn to these pieces, the carvings give it a feel of authority and antiquity, the construction is straightforward and strong. They carry a weight to them that is beyond their physical presence. Set in a room with other furniture styles and they instantly become the rock star of the room, everyone notices, everyone comments, most come up and brush their hands across the carvings. The style stands out like a bright red in a field of muted grays.

Im not sure if you can call what I do perfectly 17th century either but Im not working on reproductions as much as "work inspired by..."
I have always had a desire to create things that are different, things that stand out from the background. In my current explorations Ive found my way of moving forward by looking backwards. Inspired by Follansbee I have delved into my own research on these furniture styles, buying or borrowing many books and visiting some of the original pieces in museums. There is so much more depth to this furniture style than I think most people realize.
My wife often accuses me of being born in the wrong century, sometimes she looks at me like I just stepped through a time portal stretching from somewhere in the 12th century, and she might be onto something You dont have to agree with me, but to my medieval eyes the carvings and furniture look beautiful and desirable, no candlelight required.
Ratione et Passionis
Oldwolf
Read More..
Ever since the book "Make a Joint Stool from a Tree" came out 17th century furniture has been under a lot of discussion and I have to admit I was surprised to hear some of it. I expected to hear words like impractical and people claim that green working is not appropriate for craftsman making furniture less than everyday. The one word I was not prepared to read was "ugly."
I can remember the first time I stumbled across Peter Follansbees blog I have been smitten with 17th century style furniture. From the joinery to the carvings, especially the carvings. When I first saw his pieces I thought, now theres something I really want to be able to create.
I like 17th century furniture most because in todays modern age it looks refreshingly new and different. Look into any book on antique furniture and you will likely find a timeline showing the development of furniture styles, often starting with William and Mary baroque styles and pushing forward from there. It will hit on Chippendale, Queen Anne, Federal, Shaker, Craftsman, and Modern styles and at least a dozen more. If you take that list of styles and go to any large furniture store filled to the bursting doors with mass produced, disposable furniture you will find some watered down version of each style represented.
I have never seen an attempt at 17th century furniture in a press board, paper veneered fashion. I dont believe thats because its "ugly" I believe its because its too difficult to mass produce even a watered down piece of this style. I suppose it could be done, but why should corporations go to the bother when they already have so much other crap, built to the lowest common denominator, to convince you to buy.
The eye is drawn to these pieces, the carvings give it a feel of authority and antiquity, the construction is straightforward and strong. They carry a weight to them that is beyond their physical presence. Set in a room with other furniture styles and they instantly become the rock star of the room, everyone notices, everyone comments, most come up and brush their hands across the carvings. The style stands out like a bright red in a field of muted grays.
Im not sure if you can call what I do perfectly 17th century either but Im not working on reproductions as much as "work inspired by..."
I have always had a desire to create things that are different, things that stand out from the background. In my current explorations Ive found my way of moving forward by looking backwards. Inspired by Follansbee I have delved into my own research on these furniture styles, buying or borrowing many books and visiting some of the original pieces in museums. There is so much more depth to this furniture style than I think most people realize.
My wife often accuses me of being born in the wrong century, sometimes she looks at me like I just stepped through a time portal stretching from somewhere in the 12th century, and she might be onto something You dont have to agree with me, but to my medieval eyes the carvings and furniture look beautiful and desirable, no candlelight required.
Ratione et Passionis
Oldwolf
Monday, February 17, 2014
Portable Chicken Coop Plans What Are The Main Benefits

Portable chicken coops are actually very lightweight structures which allow you to relocate them without any real difficulty to any part of your premises. They also have a few small wheels which were put there as part of the portable chicken coop plans when the item was first designed. One other reason you want to be able to move your chicken coop often is that giving your chickens new insects and grass every few days allows them to stay much healthier overall because theyre eating much fresher food.
The best part about this is that healthy chickens produce excellent meat and excellent eggs for us to consume. Before you run out and decide to construct one please recognize all of the advantages that youll have by creating a chicken coop with portable chicken coop plans.
Here are the benefits to you in no particular order:
The first thing Id like to point out is that portable coops are very environmentally friendly. By having the ability to move your poultry coop around you allow your grass to grow back after your chickens have finished grazing on it. This will help you keep your yard in excellent condition as well as allow your chickens to eat fresh food more often which is a lot healthier for them. And one final really cool thing is you dont have to worry about cleaning your chicken pens because you could allow the chicken manure to successfully fertilize your lawn.
Next lets discuss the obvious benefit which is the portability. A portable chicken pen is much easier to move around than a poultry coop of the stationary variety. This is a great option to have in case you want to be able to move your coop into a location where youll be able to keep an eye on your hens as a way to protect them from any predators that might be roaming around your neighborhood.
The local cats and dogs in your neighborhood may pose a serious threat to the health of your chickens. And depending on what part of the world you live in there are other possible threats such as badgers and foxes, as well as many other predators that you might need to hold at bay if they are threatening the safety of your chickens. Thats why its such a good idea for you to be able to have the ability to move your coop into your line of sight. Make sure you pick up a set of portable chicken coop plans that allows you the freedom of movement that you need in order to do this.
The final major benefit you receive is quality and health. Building a portable chicken coop will greatly improve upon the eggs and meat that your chickens produce overall. Letting chickens roam freely in a free range style while consuming grass that is fresh is often the best way to treat your chickens if you are consumers of chicken meat and their eggs.
Having a portable hen house requires much easier maintenance than you need with a regular poultry coop. The coops are much simpler to clean and take care of. A common chicken coop is fixed which unfortunately makes it a lot more difficult to take care of because you often find yourself missing some dirty spots.
The best part about this is that healthy chickens produce excellent meat and excellent eggs for us to consume. Before you run out and decide to construct one please recognize all of the advantages that youll have by creating a chicken coop with portable chicken coop plans.
Here are the benefits to you in no particular order:
The first thing Id like to point out is that portable coops are very environmentally friendly. By having the ability to move your poultry coop around you allow your grass to grow back after your chickens have finished grazing on it. This will help you keep your yard in excellent condition as well as allow your chickens to eat fresh food more often which is a lot healthier for them. And one final really cool thing is you dont have to worry about cleaning your chicken pens because you could allow the chicken manure to successfully fertilize your lawn.
Next lets discuss the obvious benefit which is the portability. A portable chicken pen is much easier to move around than a poultry coop of the stationary variety. This is a great option to have in case you want to be able to move your coop into a location where youll be able to keep an eye on your hens as a way to protect them from any predators that might be roaming around your neighborhood.
The local cats and dogs in your neighborhood may pose a serious threat to the health of your chickens. And depending on what part of the world you live in there are other possible threats such as badgers and foxes, as well as many other predators that you might need to hold at bay if they are threatening the safety of your chickens. Thats why its such a good idea for you to be able to have the ability to move your coop into your line of sight. Make sure you pick up a set of portable chicken coop plans that allows you the freedom of movement that you need in order to do this.
The final major benefit you receive is quality and health. Building a portable chicken coop will greatly improve upon the eggs and meat that your chickens produce overall. Letting chickens roam freely in a free range style while consuming grass that is fresh is often the best way to treat your chickens if you are consumers of chicken meat and their eggs.
Having a portable hen house requires much easier maintenance than you need with a regular poultry coop. The coops are much simpler to clean and take care of. A common chicken coop is fixed which unfortunately makes it a lot more difficult to take care of because you often find yourself missing some dirty spots.
Wednesday, February 12, 2014
The Windsor Institute Road Trip
I left Jackson, TN Thursday 7/8 and headed off to Hampton, NH and the Windsor Institute to take the 7/12 Sack Back chair class offered my Mike Dunbar and his team of instructors, Fred and Don. It is an intense, physical class, as there is minimum use of power tools (a drill, circular saw, and instructor operated bandsaw) in the preparation and assembly of this chair. I believe you can find a direct correlation in Tylenol sales in the NE and the dates of the chair classes. I was in with a group of great people from as close as Maine, from Canada, PA, NY, OH, OK, and as far away as Seoul, South Korea. We had a young man who just turned 11 years old in our class and he did an outstanding job. His father and instructors guided him along, but he didnt need any more help than the rest of us. I have a ton of photos I took to help me for the next time, but I will summarize the assembly here to give you and idea of what "start to finish" looks like. I can say this, if you every wanted to build one of these classic chairs, learn about the chair itself and the "whys" of the design elements, you will not find anything better than attending the Institute or anyone more knowledgeable than Mike Dunbar. Mike and his crew demystify as they teach so you not only understand what you are doing, but why you are doing it.
 |
| The Windsor Institute |
Mike will send you a list of tools he recommends you need once your registration is completed. Show up on Monday with your tools, and you will get your bench location and thats is were you work for the remainder of the week.
 |
| Getting organized and ready to get going. |
 |
| Seat blank, spindles, and stretchers |
Believe it or not, what you see here will be a completed Sack Back chair by the end of the week. Yeah, I know, I didnt believe it either :)


Smoothing the seat blank. This seat is Eastern white pine. The blanks are glued up and ready to go, but you need to pay attention to the grain as it is very possible it will run in opposite directions. Got to love those shavings!!

Seat blank cut and ready to shape the inside. The cut in the middle is made by a circular saw set for a target depth of the seat in the middle.

"swing for a single-not a bunt" was the saying you heard over and over through out the room as we took the gutter adz to start shaping the seat. I guess a "home run" would eliminate one toe!! Chop, chop, chop.

Compass plane starts the smoothing process, after the scorp, this work will last a good part of the morning.
 |
| Ready for layout lines and drilling at this point |
 |
| Getting busy on the 7 back spindles, rough shaping "green" red oak so it can dry for the final shaping on Thursday. |
 |
| This steam unit is one of two that prepares the arm and bow for bending. Each student pairs up with a partner to bend these parts, |
 |
Arm and Bow in the furnace room where the conditions are set to dry these parts quickly enough that we can use them on Thursday and Friday. |
 |
| Seat drilled and ready for leg and stretcher assembly |

Legs and stretchers installed - nice stool you have there! |
 |
| Arm stumps and short spindles dry fit, now this is starting to look like a chair. |
 |
| "Hey...you got 10 minutes to get this done, we need you outside" |
 |
| Remember what we started this process with? All that remains is to fit the bow over the spindles. Holes are drilled, spindles are cut to length and wedged. |
 |
| The happy graduating class of the 7/12/10 Sack Back class. Everyone got there chairs completed and ready to head for home or where ever else they had scheduled for their trip. This was without a doubt one of the most memorable weeks I have ever spent in woodworking and I am looking forward to going back in the Spring to take the Writing Arm chair class. I loaded up the chair and headed off to Cooperstown, NY to visit the Baseball Hall of Fame and Museum. When I get back to my shop in TN, I will finish cleaning the chair up and get ready to apply the Milk Paint finish. On the last leg of the "Windsor Chair Road trip" spending a week in Cincinnati, so it will be a week or so before I get to doing that. I will post some pictures of the finished chair |
Subscribe to:
Posts (Atom)